Introduction to Creating a Bootable USB for Windows 11
When you need to perform a clean installation or an in-place upgrade of Windows 11, the Microsoft Media Creation Tool is often the go-to solution. While this tool works effectively for downloading ISO files or creating installation media, there are alternatives that can offer more flexibility and customization options. Two of the most notable third-party tools are Rufus and Ventoy.
These applications are particularly useful when dealing with both supported and unsupported hardware. This guide will walk you through the process of using these tools to create a bootable USB drive for installing Windows 11.
Why Use Third-Party Tools?
Although the Microsoft Media Creation Tool is reliable, it may not always meet every user’s needs. Third-party tools like Rufus and Ventoy provide additional features such as bypassing certain hardware requirements and offering more control over the installation process. However, it’s important to note that these are third-party applications not officially supported by Microsoft. As such, users should proceed with caution and ensure they back up any important data before proceeding.
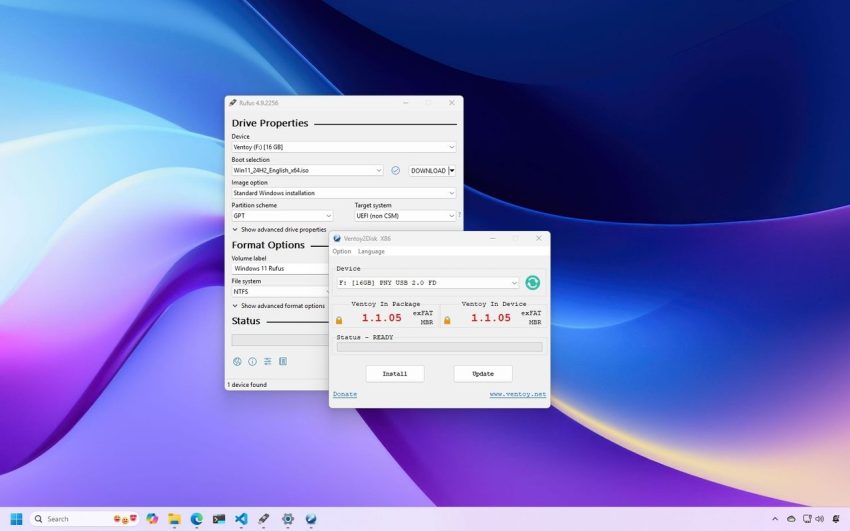
How to Create a Windows 11 Bootable USB with Rufus
Rufus is a popular free and open-source utility that many tech-savvy users and administrators prefer. It allows you to format and create a bootable USB flash drive for Windows 11 (and 10). One of its standout features is the ability to download the operating system installation files directly from the tool, along with options to customize the flash drive.
Steps to Use Rufus:
- Connect a USB flash drive of at least 8GB.
- Visit the Rufus website and download the latest release Zip file.
- Save the tool on your computer and launch it.
- If prompted, click “Yes” to check for updates, which enables the option to download the ISO file from the cloud.
- Choose the USB flash drive under the “Device” section.
- Click the down-arrow button and select the “Download” option if you don’t have the ISO file already.
- Select the Windows 11 option and continue through the steps to choose the latest version, language, and architecture.
- Choose the “Standard Windows 11 Installation” option under the “Image option” setting.
- Select the GPT partition scheme and UEFI (non CSM) target system.
- Customize settings as needed, including bypassing hardware requirements or online account requirements.
- Click the “Start” button to begin the process.
After completing these steps, Rufus will create a custom USB flash drive for installing the operating system.
How to Create a Windows 11 Bootable USB with Ventoy
Ventoy is another excellent alternative to the Media Creation Tool. Unlike Rufus, it doesn’t create installation media but instead installs on the USB flash drive to make it bootable. You then add the ISO file of any operating system, such as Windows 11, 10, or Linux.
Once the ISO files are added, you can start the computer with the Ventoy software and select the desired ISO file from the boot menu.
Steps to Use Ventoy:
- Connect a USB flash drive of 8GB or more.
- Visit the Ventoy website and download the latest release Zip file.
- Extract the files and run Ventoy2Disk.exe.
- Select the flash drive from the “Device” setting and click “Install.”
- Follow the prompts to complete the installation.
- Download the Windows 11 ISO file from the Microsoft Support website.
- Copy and paste the ISO file into the USB flash drive.
Once completed, Ventoy will make any ISO file on the flash drive bootable.
Differences Between Rufus and Ventoy
One key difference between these tools is that a USB flash drive created with Rufus can be used for a clean installation or an in-place upgrade from the desktop environment. In contrast, Ventoy only allows booting the device to launch a specific setup.
Additionally, Rufus offers a direct download option for the ISO file, while Ventoy requires you to provide the image file. However, Ventoy is more straightforward for users who frequently reformat their drives to install different versions of the operating system.
Conclusion
Whether you choose Rufus or Ventoy depends on your specific needs. If you’re looking for a tool that offers more customization and flexibility, Rufus might be the better choice. On the other hand, if you want a simple solution that supports multiple ISO files, Ventoy could be the way to go.
Have you tried either of these tools for installing Windows 11? Which one worked better for you? Share your experiences in the comments below.